The Ultimate Hip Mobility Exercises Guide
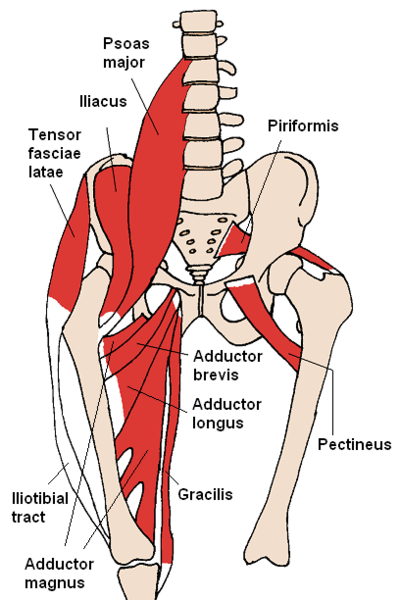
The hip is a 360 rotatable joint, that is responsible for the most important movements that you perform in everyday life. Its complex connection of tendons & joints is the reason why it can be difficult to train all muscles around your hip joint. (read more about anatomy)
Especially with the number of people that suffer from a lack of movement, it is one of the most common areas to cause problems. Activities such as sitting, or simply standing with a bad posture are causes for reduced hip mobility amongst the population.
If you ever faced knee, lower back or hip problems, you need to start working on your hip mobility, strength & stability! Since almost any movement goes through the hips, the consequences of neglecting your hips are going to be pretty bad.
In this guide, we are going to explain how to improve hip mobility by following simple movement patterns!
Mobility vs Flexibility
Before diving into strengthening exercises & training methods we want to clear up the confusion between mobility & flexibility!
During the past years, people have been confusing & interchanging the two terms on a daily basis, as they both seem closely related.
In fact, mobility & flexibility are both closely related to the range of motion that a person has.
So what's the difference?
Definition Flexibility
Flexibility is the ability to move your connective tissue with the help of another person, object or tool.
Example Flexibility
When being in a split you are training your flexibility, as gravity itself works as a tool to stretch your muscles.
Definition Mobility
On the other hand, mobility is the ability to move your connective tissue without external help and in a controlled manner.
Example Mobility
If you are lifting one leg up towards your chest, while the other leg stays on the ground, you would be working on mobility.
We hope this explanation helped, but if there are any questions left, feel free to ask them below!
How To Improve Your Hip Mobility
You might guess, that doing hip mobility exercises will help.
Of course, it was the right guess, but it is important to understand, that there are multiple factors that affect your hip mobility.
- StrengthFlexibilityStabilityMobility
Below you will find some of the best exercises to train each category. Combining all four factors while working on different hip rotation exercises is going to be the most beneficial!
Hip Strength Exercises
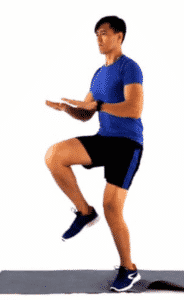
Standing Knee Raise:
To perform the standing knee raise you are going to stand on one leg while holding your balance you want to lift your knee as far up as you can.
Since the exercise is quite easy without additional resistance, we recommend using an elastic band to increase difficulty.
With the foot on your ground, you simply step onto the elastic band, while the other foot goes into the loop as well.
Vary the difficulty to a point where you can do 3 sets of 10-12 repetitions by choosing an elastic band that has the correct tightness for you.
Walking Lunges
Another excellent strengthening exercise, that additionally works on stability are walking lunges. To do a walking lunge you are going to start with both feet together. Then you step forward with one foot and perform the lunge; both legs are going to bend, while the knee of your back leg should touch (get very close) to the floor.
It is important to have the entire front leg on the floor, while only the toes/balls of the feet of the back leg touch the floor.
In case you need a visual reference we have pinned a video below!
Furthermore, you can adjust the difficulty of the exercise by adding weights, which will engage your strengthening muscles and hip & leg muscles more!
Deep Squat
Performing deep squats is quite simple. Do the same motion as with regular squats while focusing on getting your bottom to touch the ground if possible.
Hip Flexibility Exercises
When training hip flexibility stretches can help a lot to increase your hip flexibility. But it is important to note that stretching alone will not be beneficial if you aim to increase your hip mobility.
Muscular dysbalances can worsen when stretching a weak muscle. Therefore you should be aware, that there is a significant difference between weakness & tightness although both can feel quite similar!
Butterfly Stretch:
The first stretch on the list starts by going into a butterfly position. To do so you start by sitting on the floor with both knees bent. Next, you try to push both knees outwards towards the floor, while your feet entirely touch each other.
If you want to, you can place your hands onto your feet while slightly pulling your legs up to increase the stretch. But never lift your feet off the floor!
Try to get both knees as close as possible to the floor to loosen up your tight hips.
One key aspect of the exercise is to keep having a straight back, while also your head should be in a natural position.
Variations
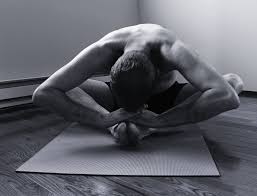
To target another region of your psoas muscle you can lower your body as far down as you can to the point where your head touches your feet.
Kneeling Lunge:
Another stretch that might help you to dissolve your hip pain is the kneeling lunge. Go into a lunge position, while your knee should touch the ground.
Try to push your hips forward as far as you can while maintaining a straight back. Hold the stretch for 30 seconds before switching sides.
Pigeon Stretch:
Yoga has brought up a lot of useful & effective stretches around your entire body. The pigeon stretch is probably one of the best stretches for your hip-flexors, although it can be hard to perform the very first time. But if you keep working on the stretch, it will help you to eventually release tension around your hip flexors!
For additional yoga poses that work on your hips, you should browse through this yogajournal, as they have an entire section on hip flexor poses.
The easiest way to get into the position is to start in a push-up position. Next, you are going to bring either your left or right knee forward.
Your lower leg should be pointing towards your other leg, but try to get your foot further towards your hands to increase the stretch.
Lower yourself down slowly until your entire back leg is on the floor. Hold the position for at least 30 seconds before switching legs.
If you need further instructions you can watch the Yoga video below.
Hip Stability Exercises
Glute Bridge:
The glute bridge is an excellent exercise to engage the stabilizing muscles around your hip flexors. One of the biggest benefits is that you can do this exercise anywhere as you don't need any equipment besides the floor.
Start by laying down on your back; then you should bend your knees while your arms lying next to your upper body.
The actual exercise starts by pushing your hips up as far as possible. If you want to work on additional hip stability, you should try to hold the bridge at its highest point for roughly 3-5 seconds before going down.
In case the regular glute bridge is too easy for you there are different variations to make the exercise harder;
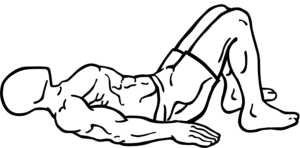
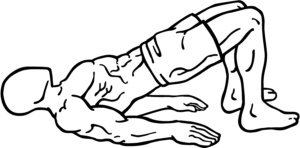
- Single-Leg Glute Bridge
With the single-leg glute bridge you are going to do the exact same exercise but with the difference that one of your legs constantly stays above the ground pointing towards the ceiling the entire time.
By doing the exercise with only one leg it is going to be a lot harder to keep your hips stable without twisting them, which engages the entire musculature around your hips!
- Unstable Ground
If you have access to a gymnastics ball or an unstable surface, you can do the exact same exercise but with both legs on the unstable surface.
Get creative! Even a thick pillow is going to additionally engage your stabilizing muscles!
Side Plank:
Another excellent exercise to work on your hip stabilizing muscles is the side plank. It is quite well known amongst fitness enthusiasts, but few people are aware of its potential to strengthen your hips!
If you work on hip stability it is important to support yourself only on one leg, to make the element of balance harder.
Your upper body is going to be supported by one arm, whereas your entire forearm is going to lay on the floor.
Maintain a straight line from your upper body all the way to your legs, by engaging your core muscles and hip flexors.
To increase the difficulty of the exercise you can lift the leg that lays on your bottom leg to additionally engage your hip muscles!
Exercises For Hip Mobility
Straight Leg Swings
Before getting into the exercise it is important to mention, that there are different versions & angles to perform the straight leg swing, which should all be implemented to gain hip mobility.
Furthermore, it is important to perform the exercise in a controlled speed to avoid injury. When doing the exercise to fast you are not going to gain any additional strength & increase the risk of pulling a muscle when not warmed up!
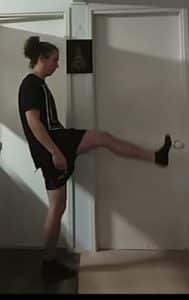
- Forwards & Backwards
When doing straight leg swings forwards & backward you are going to stand on one le sideways next to a wall/table to balance your own weight with one hand.
The next step is to swing/lift the leg up while keeping it straight, then lower it slowly down. Once you reach the starting position you are going to start swinging the leg backwards.
Here it is important to keep your back straight and upright, to get the most out of the exercise!
Try to lower your leg down slowly without letting gravity do the work! Remember to switch legs to work on both sides of your hip muscles.
If you want an additional challenge you can try to do the same exercise without holding onto the wall, which will engage your stabilizing muscles more!
- Sideways
When doing the exercise sideways the same rules apply (straight leg & controlled motion)
Start by facing a wall/high table forwards. This time you can use both hands to balance yourself, although it is important to still stay upright throughout the entire range of motion.
You are going to start by swinging one leg up and then lowering it slowly down & up towards the other side.
Once again, the exercise can be done without your hands to increase difficulty.
Additionally, there is the option to add ankle weights, although for mobility the exercise works best without them. (ankle weights turn it into a strength exercise)
- At a 45 Degree Angle
The last variation is an angle, that people tend to forget; but since your hips rotate in different angles it is important to do the 45-degree angle as well!
Swing your leg diagonally at a 45-degree angle while holding onto another object if necessary.


Bonus Exercise:
In comparison to other exercises on the list, this exercise is going to be slightly more complicated. But it is going to work excellent if you want to improve your hip mobility, stability & strength at the same time, which is why we included it on the list.
If you are working out in a gym it helps to have access to a smith machine. Although all you need is a bar that is around your own hip height.
In case you train at home, you can do the exact same exercise by placing a broomstick on top of two chairs.
For visual learners, it is best to watch the video by AthleanX below, as it can be easier to understand the motion.
Stand next to the bar facing it sideways, then you are going to position one leg on the other side of the bar.
Move into a sumo squat position while both feet are parallel to the bar, next you are going to slowly move your upper body under the bar until you are at the other side.
Finally, you rotate your hips so that you end up in a lunge position, whereas you start by rotating back to the sumo squat position.
Move your upper body below the bar (without ducking your head!) and then rotate towards the lunge position again.
Once you are in the lunge position it is important to lean over to additionally stretch your hip flexors!
Watch the video below for a more detailed explanation of the exercise!
Start watching at the third minute if you want to get straight into the exercise.
How Many Sets & Reps?
Stretching
When stretching it is important to hold the position for an adequate time to avoid over & under stretching. In most cases, it works best to hold the stretch for roughly 30 seconds, before switching sides if it is a one-sided stretch.
Perform the stretch at least 2-3 times before moving to the next stretch if you want to have quick results.
Strength & Mobility
Besides repetitions, there is actually a better measurement for an exercise. It is called time under tension, which basically stands for the time that you perform an exercise for.
When working on your hip flexors you should perform an exercise for 20-30 seconds, for most exercises that would mean roughly 10-12 repetitions.
Once again it is important to do between 2-3 sets and to incorporate different exercises at once to work on every muscle group around your hips!
Conclusion:
The hip flexors can be a challenging area to work on. Since the hip joint has multiple functions at a time it is important to do a variety of different exercises & stretches. Even though it might take you 20-30 minutes 3x per week it is going to be very beneficial to train your hips.
The reward eventually is going to be better life quality & less pain around your hips, knees & lower back. It is quite impressive how vital your hip muscles & joints are, which is why you shouldn't neglect them!
